10 Top Photography Composition Rules
There are no fixed rules in photography, but there are guidelines which can often help you to enhance the impact of your photos.
The only rule in photography is that there are no rules. However, there are many composition guidelines which can be applied in almost any situation, to enhance the impact of a scene. Below are ten of the most popular and most widely respected composition ‘rules’.
Rule of Thirds
Imagine that your image is divided into nine equal segments by two vertical and two horizontal lines. Try to position the most important elements in your scene along these lines, or at the points where they intersect. Doing so will add balance and interest to your photo. Some cameras even offer an option to superimpose a rule of thirds grid over the LCD screen, making it even easier to use.

Balancing Elements
Placing your main subject off-centre, as with the rule of thirds, creates a more interesting photo, but it can leave a void in the scene which can make it feel empty. You should balance the ‘weight’ of your subject by including another object of lesser importance to fill the space.

Here, the visual ‘weight’ of the road sign is balanced by the building on the other side of the shot. Image byShannon Kokoska.
Leading Lines
When we look at a photo our eye is naturally drawn along lines. By thinking about how you place lines in your composition, you can affect the way we view the image, pulling us into the picture, towards the subject, or on a journey ‘through’ the scene. There are many different types of line – straight, diagonal, curvy, zigzag, radial etc – and each can be used to enhance our photo’s composition.

Symmetry and Patterns
We are surrounded by symmetry and patterns, both natural and man-made., They can make for very eye-catching compositions, particularly in situations where they are not expected. Another great way to use them is to break the symmetry or pattern in some way, introducing tension and a focal point to the scene.

The symmetry of this chapel is broken by the bucket in the bottom right corner. Image by Fabio Montalto.
Viewpoint
Before photographing your subject, take time to think about where you will shoot it from. Our viewpoint has a massive impact on the composition of our photo, and as a result it can greatly affect the message that the shot conveys. Rather than just shooting from eye level, consider photographing from high above, down at ground level, from the side, from the back, from a long way away, from very close up, and so on.

The unusual viewpoint chosen here creates an intriguing and slightly abstract photo. Image by ronsho.
Background
How many times have you taken what you thought would be a great shot, only to find that the final image lacks impact because the subject blends into a busy background? The human eye is excellent at distinguishing between different elements in a scene, whereas a camera has a tendency to flatten the foreground and background, and this can often ruin an otherwise great photo. Thankfully this problem is usually easy to overcome at the time of shooting – look around for a plain and unobtrusive background and compose your shot so that it doesn’t distract or detract from the subject.

The plain background in this composition ensures nothing distracts from the subject. Image by Philipp Naderer.
Depth
Because photography is a two-dimensional medium, we have to choose our composition carefully to conveys the sense of depth that was present in the actual scene. You can create depth in a photo by including objects in the foreground, middle ground and background. Another useful composition technique is overlapping, where you deliberately partially obscure one object with another. The human eye naturally recognises these layers and mentally separates them out, creating an image with more depth.

Emphasise your scene’s depth by including interesting subjects at varying distances from the camera. Image byJule Berlin.
Framing
The world is full of objects which make perfect natural frames, such as trees, archways and holes. By placing these around the edge of the composition you help to isolate the main subject from the outside world. The result is a more focussed image which draws your eye naturally to the main point of interest.

Here, the surrounding hills form a natural frame, and the piece of wood provides a focal point. Image by Sally Crossthwaite.
Cropping
Often a photo will lack impact because the main subject is so small it becomes lost among the clutter of its surroundings. By cropping tight around the subject you eliminate the background ‘noise’, ensuring the subject gets the viewer’s undivided attention.

Cut out all unnecessary details to keep keep the viewer’s attention focused on the subject. Image by Hien Nguyen.
Experimentation
With the dawn of the digital age in photography we no longer have to worry about film processing costs or running out of shots. As a result, experimenting with our photos’ composition has become a real possibility; we can fire off tons of shots and delete the unwanted ones later at absolutely no extra cost. Take advantage of this fact and experiment with your composition – you never know whether an idea will work until you try it.

Digital photography allows us to experiment with different compositions until we find the perfect one. Image byJule Berlin.
Composition in photography is far from a science, and as a result all of the ‘rules’ above should be taken with a pinch of salt. If they don’t work in your scene, ignore them; if you find a great composition that contradicts them, then go ahead and shoot it anyway. But they can often prove to be spot on, and are worth at least considering whenever you are out and about with your camera
Shooting in JPEG or Shooting in RAW
The following tip on RAW vs JPEG was submitted by Richard and Rebecca from Finn Productions (You can see their Flickr account here) . It came out of a discussion in our Flickr Group titled JPG or RAW. There is actually a lot of good discussion already in this thread so once you’ve read the following head over and see what others have to say on the topic.
For the best tutorials, Follow netglos @twitter andnetglos.com
So, you’ve forked over at least $600 (but probably $1000) for your first DSLR camera. You have more buttons, dials, and menus than you know what to do with, even after reading through the fat booklet that came with your camera and explains its usage in ten differnent languages.
It’s all you can do to understand ISO, shutter speed, and how less is more when it comes to aperture. This beast of a camera can produce files in a Raw format, whatever that means, but it also has the nice comfortable JPEG format that we all know and love.
Like me you probably happily shoot in JPEG for quite awhile – getting used to the myriad of options available to you. One day you look at that Raw setting and ask, “should I be using Raw for the best quality? What is Raw, exactly?”
Excellent question. First, let us define these two formats.
A Raw file is…
• not an image file per se (it will require special software to view, though this software is easy to get).
• typically a proprietary format (with the exception of Adobe’s DNG format that isn’t widely used yet).
• at least 8 bits per color – red, green, and blue (12-bits per X,Y location), though most DSLRs record 12-bit color (36-bits per location).
• uncompressed (an 8 megapixel camera will produce a 8 MB Raw file).
• the complete (lossless) data from the camera’s sensor.
• higher in dynamic range (ability to display highlights and shadows).
• lower in contrast (flatter, washed out looking).
• not as sharp.
• not suitable for printing directly from the camera or without post processing.
• read only (all changes are saved in an XMP “sidecar” file or to a JPEG or other image format).
• sometimes admissable in a court as evidence (as opposed to a changeable image format).
• waiting to be processed by your computer.
In comparison a JPEG is…
• a standard format readable by any image program on the market or available open source.
• exactly 8-bits per color (12-bits per location).
• compressed (by looking for redundancy in the data like a ZIP file or stripping out what human can’t perceive like a MP3).
• fairly small in file size (an 8 megapixel camera will produce JPEG between 1 and 3 MB’s in size).
• lower in dynamic range.
• higher in contrast.
• sharper.
• immediately suitable for printing, sharing, or posting on the Web.
• not in need of correction most of the time (75% in my experience).
• able to be manipulated, though not without losing data each time an edit is made – even if it’s just to rotate the image (the opposite of lossless).
• processed by your camera.
These differences lead implicitly to situations that require choosing one over the other. For instance, if you do not have much capacity to store images in camera (because you spent all your money on the camera body) then shooting in JPEG will allow to capture 2 or 3 times the number you could shooting in Raw. This is also a good idea if you are at a party or some other event afterwhich you want to share your photos quickly and easily.
On the other hand, if capacity is not an issue at all (1 GB and 2 GB flash cards are getting cheaper every week) you might consider shooting in Raw + JPEG, just to cover all the possibilities. If you cannot or do not want to do any post processing, then you simply have to shoot in JPEG. Taking a picture in Raw is only the first step in producing a quality image ready for printing. If, on the other hand, quality is of the utmost importance (like when you are shooting professionally), and you want to get every bit of performance your DSLR can offer then you should be shooting in Raw.
That being said, I know many professional photographers who do not shoot in Raw for one of two reasons: 1.) they don’t know how, or 2.) they don’t want to take the time to process the images afterwards.
Shooting in JPEG
When you shoot in JPEG the camera’s internal software (often called “firmware” since it’s part of the hardware inside your camera) will take the information off the sensor and quickly process it before saving it. Some color is lost as is some of the resolution (and on some cameras there is slightly more noise in a JPEG than its Raw version).
The major actor in this case is the Discrete Cosine Transforamtion (or DCT) which divides the image into blocks (usually 8×8 pixels) and determines what can be “safely” thrown away because it is less perceivable (the higher the compression ration/lower quality JPEG, the more is thrown away during this step). And when the image is put back together a row of 24 pixels that had 24 different tones might now only have 4 or 5. That information is forever lost without the raw data from the sensor recorded in a Raw file.
The quality of a JPEG taken with a DSLR will still be far better than the same shot taken with a top-of-the-line point-n-shoot camera that is as old as your DSLR. If your camera can burst (shoot continuously for a few seconds) you’ll actually be able to shoot more shots using JPEG than Raw because the slowest part of the whole process is actually saving the file to your memory card – so the larger Raws take longer to save.
Shooting in Raw
If you do shoot in Raw, your computer rather than the camera will process the data and generate an image file form it. Guess which has more processing power: your digital camera or your computer? Shooting in Raw will give you much more control over how your image looks and even be able to correct several sins you may have committed when you took the photograph, such as the exposure.
To take advantage of this you will certainly need to use some software on your computer to process the files and produce JPEGs (or TIFFs). I have found the Camera Raw that comes with Adobe Photoshop CS2 to be very good at processing Raw files (even batch processing them), though everybody has their favorite (RawShooter has a lot of fans). When you load a Raw file using Adobe Photoshop CS2 the Camera Raw dialog will automatically pop up. Most of the time the automatic settings are fairly decent, but you have the chance to change the white balance, exposure, contrast, saturation, and even calibration of the red, green, and blue guns or correct for lens abberation – all lossless.
If the white balance is off I have found that it is much easier to fix using the Camera Raw screen than loading the JPEG and manipulating that – the end result is much better as well. The richness, detail (sharpness), color range and ability to adjust these settings end up being so much greater with a Raw file, even though what a Raw file looks like before processing is anything but rich and sharp. As a side note, all of my work that uses creative coloring was colored using the white balance settings in the Camera Raw dialog.
Part of the conversion to JPEG are sharpening algorithms and as a result, the unprocessed Raw file is less sharp. Two things can affect this, one is the brand of camera (Nikon cameras are generally considered sharper, but this is not true across all models) and the other factor is the user settings for sharpening in the camera. Loading a Raw file in a program such as Adobe Photoshop CS2 will automatically apply white balance, sharpening, constrast, brightness, etc… and can even batch process Raw files. I often use this feature as a first pass and then go back and adjust the settings if needed. This is espeacially helpful because even if I did everything correct in camera when I took the photo and my conversion software was able to use the full processing power of my desktop computer, the conversion to JPEG could still trick the camera or my computer and only my eye can produce the correct while balance, constast, brightness, etc…
What software is good to use with Raw?
• Microsoft RAW Image Thumbnailer and Viewer for Windows XP (essential for Windows based photographers)
• Picasa (Free!)
• Adobe Photoshop CS or CS2
• RawShooter Premium (recently bought by Adobe)
• ACD See (for Digital Asset Management)
• Portfolio Extensis 8 (for Digital Asset Management)
• iView Media Pro (DAM, recently bought by Microsoft)
• BreezeBrowser Pro (DAM, I also love their Downloader Pro for use with my card readers)
• Adobe Lightroom (beta)
• Capture One
• IrfanView
• DXO Optics Pro
• Picture Window Pro
• the software that came with your camera
• more software comes out all the time…
Considerations
There are a few other issues to worry about when shooting in Raw, such as color space (Adobe 1998 vs. sRGB). I’ve used both color spaces, but sRGB is closer to most ink jet, pigment, and lab printers (the place where I get my photos printed requires sRGB). If you want all 12-bits of color (as opposed to the 8-bits of a JPEG) you will need to store your image as a TIFF.
Some people will also convert their proprietary Raw files (with extensions like .CRW, .CR2, .NEF, etc..) into the Adobe digital negative format (.DNG) to make sure those files will be readable in the far flung future. I have yet to spend the time doing this because I haven’t seen the need. For archival, however, consider getting gold DVDs because the gold lining lasts 50 – 100 years (much longer than the maximum of about 25 years for silver lined DVDs or CDs). Keep more than one backup if your images are important (and keep the second backup at a different location, such as the house of a friend or relative).
When it comes to your photography, however, you are the ultimate decision maker on what is best. I recommend that, if you haven’t, you play with the Raw format. You certainly won’t harm yourself or your camera. In fact, a great test is to go out just to shoot somehting (even just in the backyard or around the block). Shoot severalphotographs under various lighting conditions using the Raw + JPEG setting on your DSLR (if it has that capability). Take them back to your computer and compare after processing the Raw files. Take into consideration your time in doing so and see if the gain is worth your extra time.
Thanks again to Rebecca and Richard from Finn Productions for this article on JPEG vs RAW. Head over to our Flickr Discussion group on the topic to read more on the topic or to have your say.
Understanding White Balance for Photography
If you come from the world of films, you may remember using filters to correct for incandescent or fluorescent lighting. Most people don’t bother and their indoors pictures invariably come out with a yellow/orange or bluish cast. In the digital world, these correction filters are no longer necessary, replaced by a feature found in most — even the entry-level — digital cameras called, “White Balance.”
For the best tutorials, Follow netglos @twitter andnetglos.com
Light Colour Temperature
The reason that pictures turn out with a yellow/orange cast in incandescent (tungsten) lighting and bluish in fluorescent lighting is because light has a colour temperature. A low colour temperature shifts light toward the red; a high colour temperature shifts light toward the blue. Different light sources emit light at different colour temperatures, and thus the colour cast.
By using an orange or blue filter, we absorb the orange and blue light to correct for the “imbalance” — the net effect is a shift in the colour temperature.
In digital photography, we can simply tell the image sensor to do that colour shift for us. But how do we know in which direction of the colour temperature to shift, and by how much?
Manual White Balance
This is where the concept of “White Balance” comes in. If we can tell the camera which object in the room is white and supposed to come out white in the picture, the camera can calculate the difference between the current colour temperature of that object and the correct colour temperature of a white object. And then shift all colours by that difference.
Most advanced digital cameras therefore provide the feature to manually set the white balance.
By pointing the camera at a white or gray card (angled so that it is reflecting light from the room) as a neutral reference, filling the screen completely with it, then pressing the White Balance button (or set it in the menu), the camera does its WB calculation.
From then on, any picture taken will have its colour temperature shifted appropriately. It’s quite simple, really, and you should not be afraid to try it out and see your indoors pictures improve considerably (assuming there is enough light for correct exposure).
[A "neutral" gray is 18% gray and will reflect all colors equally.]
Caution:
- Ensure the card is not in shadows, but illuminated by the artificial light in the room
- If you are bouncing light off the walls, ensure the card is reflecting the bounced light
- Beware of mixing artificial lights — in this case, you might want to use RAW and adjust in post processing for each light
- Beware of fluorescent light: since fluorescent light does not contain all the spectrum of light, you may obtain unexpected results
Preset White Balance
To help us in those special situations without having to go through the trouble of manually setting the white balance everytime, cameras provide preset WB settings such as, Tungsten, Fluorescent, Cloudy, Sunny, etc. Using preset WB can improve on a picture, especially under indoors lighting.
| White Balance | |
 | 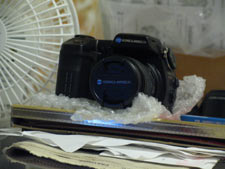 |
| AWB | Preset WB = Tungsten |
In the above example, the picture on the left is taken with the camera set to Auto WB. The indoor lighting is by two ordinary incandescent (tungsten) bulbs from the ceiling. It’s not bad, but the fan should really be white. By dialing in a preset Tungsten WB, the image gives a truer representation of the scene.
Usually just selecting a Preset WB setting appropriate for the lighting situation is enough.
Auto White Balance
Since the days of the Kodak Brownie cameras, manufacturers have tried to automate everything for us. Hence, today’s digital cameras also all sport an Auto White Balance (AWB) function. Depending on the camera brand, some AWB works better than others. On the whole, though, AWB works very well in sunny and cloudy outdoors, and fine for most indoors situations (a little orange or bluish cast does sometimes contribute to the mood of the picture anyway, e.g. the warm orangle glow of a candle).
Set your digital camera to AWB and take pictures under tungsten, fluorescent, and mixed lighting (i.e. tungsten or fluorescent, plus natural light coming through the window), and see if the results are OK. If they are, you can just use AWB.
Snow
Pictures of snow scenes typically reproduce the snow not as white but with a bluish tinge. Sometimes, the blue adds to the mood of the picture, but at other times you may want to remove the blue.
If your digital camera allows custom WB, then set the White to the snow and the blue should disappear.
| Snow – Using Custom WB | |
 |  |
| AWB | Custom WB |
If your digital camera does not allow custom WB, then post processing can be as effective. In PhotoshopElements, I used Enhance – Color – Color Cast… to specify the snow as being white, and the resulting image is as good as the one using custom WB.
| Snow – Color Cast in Photoshop | |
|  |
| AWB | Color Cast in Photoshop |
Special Effects
Once you’ve selected a WB setting, just remember to reset this white balance setting when you head back outdoors into natural light, or you may end up with some strange, out of this world, colours.
In fact, by dialing in a WB setting inappropriate for the lighting situation allows us to create some special effects.
Let’s say you are taking a picture outdoors and you want to make the light warmer, perhaps creating a late evening, sunset effect. To do that, we dial in a Fluorescent WB, in effect telling the camera that the light is too cool. The camera responds by shifting every colour toward the warm, red values. Dial in a Tungsten WB, and the camera shifts all colours toward the cool, blue values. Lots of trial and error recommended here.
RAW File Format
A discussion in WB would not be complete without a mention of the RAW file format available in many advanced digital cameras. When you save an image in RAW file format, you are saving it the way the image sensor sees it — without applying any adjustments (including white balance) to it. In fact, the camera ignores any WB setting you dial in.
Later, in an image editing software with the appropriate RAW plug-in, you can convert the RAW image to JPEG, and apply any colour temperature shift. Undo your change and try again, ad infinitum, in as fine an increment as you wish, until you obtain perfect colour balance.
Some professional photographers always use RAW file format. Saving in RAW file format comes at a price because it takes so much longer to save a RAW image that it might not be practical in many picture taking situations. Professional dSLRs (and some prosumer models) have internal buffers that allow RAW images to be taken one after the other in quite rapid succession without having to wait for the saving of one image to be completed before you can take the next picture.
If you are taking landscapes, and it’s early in the morning or late in the evening, or you are not too sure of which WB setting to use, try it in RAW.
A few digital cameras even allow you to save an image in both RAW and JPEG simultaneously, though time to write to memory card is proportionally increased.
Summary
For most of us, Auto WB is fine and does a pretty good job in diverse situations, outdoors and indoors.
For those occasions when you are not happy with the colour cast of your picture, choose one of the preset WB settings.
If this still does not give you what you want, consider manually setting the white balance by using a white card or sheet of paper (or white T-Shirt, etc.).
And, for ultimate control over white balance, consider shooting in RAW file format, and adjust in post-processing.
White Balance in Photography

For the best tutorials, Follow netglos @twitter and netglos.com
| ExpoImaging ExpoDisc |
White balance is an adjustment that accounts for the color temperature of the light in a scene. All light sourcesemit light at a specific color temperature, which is expressed in Kelvin. As the light travels, it may pass through particles in the atmosphere or a filter on the lens, which filters some of the wavelengths. For example, a sunset is usually around 3000-4000K, while bright, midday sun is about 5000-6500K. The sun is always the sun, so the change in color temperature from midday to sunset is due to the amount of atmosphere and particles like smoke or dust through which the light travels. When we adjust the white balance on the camera, we’re essentially telling the camera to account for the color temperature to make the colors more neutral. Whites will look white, greens will look green, reds will look red.
 WhiBal White Balance Card WhiBal White Balance Card |  Datacolor SpyderCube Datacolor SpyderCube |  Brno baLens |
Reflective-Style White Balance
If you have a neutral subject like a white piece of paper or a gray building, you can key off of that. In nature photography, however, we seldom have a white sheet of paper in the scene to use as a neutral point, but you can carry something with you and use that to balance the scene.
If you have a neutral subject like a white piece of paper or a gray building, you can key off of that. In nature photography, however, we seldom have a white sheet of paper in the scene to use as a neutral point, but you can carry something with you and use that to balance the scene.
The WhiBal White Balance card (www.rawworkflow.com) is a neutral gray card that you can use to set white balance in the field or to make adjustments to a file when you process the RAW files (those of us who shot film and used handheld spot meters will find the WhiBal reminiscent of a traditional gray card and it’s used in roughly the same way). The WhiBal is designed for low reflectivity, it’s perfectly gray, and it doesn’t respond to UV light any differently than the visible spectrum. Place the card in the scene and key off of it, or take a picture with the card in the scene (then remove it for your “real” exposures) and use your processing software to get the proper color temperature setting. You then can apply that color temperature to all your other images shot under the same lighting conditions.
The Datacolor SpyderCube (spyder.datacolor.com) looks like a black-and-white Christmas ornament with a small shiny ball on it. The cube’s surfaces are white, gray and black, and each surface is spectrally neutral. One face of the SpyderCube has a hole that acts as a black trap to give you a control point for shadow detail. You can use it to set the proper color temperature while you’re shooting, or take a picture, remove the SpyderCube and use the image with the cube to set the color temperature for the series when you’re processing the images in the computer.
Incident TTL-Style White Balance
A different way to get your white balance set is with a device that sits on the front of your lens and lets you auto-white balance off of it. Available in most standard diameters, the Brno baLens (www.hpmarketingcorp.com) simply snaps onto your camera lens, and you can attach a neutral or a warm-colored dome to it to get the results you want. The baLens also can do double duty as a lens cap.
A different way to get your white balance set is with a device that sits on the front of your lens and lets you auto-white balance off of it. Available in most standard diameters, the Brno baLens (www.hpmarketingcorp.com) simply snaps onto your camera lens, and you can attach a neutral or a warm-colored dome to it to get the results you want. The baLens also can do double duty as a lens cap.
ExpoImaging (www.expoimaging.com) makes a few different on-the-lens-type, white-balance tools. Designed for DSLRs, the ExpoDisc snaps onto your lens with a pressure-release friction mount. Press the button and it pops off, leaving you ready to shoot. The company manufactures the discs to strict tolerances, ensuring 18% transmission and neutrality in the visible spectrum. That neutrality, of course, is critical for getting the most accurate white balance possible. There’s also an ExpoImaging white-balance tool for video, as well as one for point-and-shoot cameras.
 Lally Cap Lally Cap |
Another on-the-lens white-balance tool is the Lally Cap (www.lallyphotography.com). It’s unique as a one-size-fits-all solution that can be used on just about any lens. The fabric “cap” slips over the lens sort of like a small sock, you set the white balance, and then you can just pull it off and stuff it in your pocket.
All of the devices mentioned in this Solutions article can fit into your gear bag and weigh almost nothing. The point is that you should always carry at least one of them in your bag. You’ll be ready with the perfect white-balance tool when the perfect day for shooting comes along.
High-ISO settings in Photography
There sure is a lot of talk about high ISOs these days. Some folks even say high-ISO shooting is the new frontier of digital photography. Camera makers seem to be focusing their efforts on producing better, cleaner, less noisy images, and that translates directly into improvements at high ISOs. Here are four facts about high-ISO speeds that may make you a better photographer—especially when working in low light.
For the best tutorials, Follow netglos @twitter andnetglos.com
1. High ISOs can have minimal noise.
Sure, back in the film days it was true that working at high ISOs and pushing film processing often translated into so much grain that it became hard to make out details (especially in the shadows) of negatives. But with the advances in noise reduction from today’s digital cameras and RAW converters, higher ISOs produce image quality unparalleled by high ISO films. Not only that, digital high ISOs are so low noise these days that many photographers are putting them to use in ways they never considered before—like nighttime exposures that are short enough to render starry skies without blurring, or photographing in dark interiors without the need for fill flash illumination. Photographerstoday know they can pull detail out of the darkest of shadows, and much of that is thanks to the same improved signal-to-noise ratio that makes high ISOs so darn attractive.
Sure, back in the film days it was true that working at high ISOs and pushing film processing often translated into so much grain that it became hard to make out details (especially in the shadows) of negatives. But with the advances in noise reduction from today’s digital cameras and RAW converters, higher ISOs produce image quality unparalleled by high ISO films. Not only that, digital high ISOs are so low noise these days that many photographers are putting them to use in ways they never considered before—like nighttime exposures that are short enough to render starry skies without blurring, or photographing in dark interiors without the need for fill flash illumination. Photographerstoday know they can pull detail out of the darkest of shadows, and much of that is thanks to the same improved signal-to-noise ratio that makes high ISOs so darn attractive.
2. Digital ISOs aren’t contrasty like film.
When working with fast film speeds, photographers often found themselves pushing exposures by underexposing in camera and overdeveloping in the darkroom. While this process did provide higher-working ISOs than the film was rated for, it also introduced some major drags on the image quality—both the grain mentioned previously as well as a whole ton of contrast. So much contrast, in fact, that high-ISO film images could sometimes look like abstract art. Imagine a grainy image with very little detail in the shadows and highlights—and none available to be pulled from the negative. That just doesn’t hold true today when working with RAW files. RAW is especially capable of rendering detail in very dark shadows, and the only processing that eliminates shadow detail comes from underexposed files. If you can overexpose a digital image even slightly, you’ll be amazed at the detail that remains in the dark tones without any contrast gain at all.
When working with fast film speeds, photographers often found themselves pushing exposures by underexposing in camera and overdeveloping in the darkroom. While this process did provide higher-working ISOs than the film was rated for, it also introduced some major drags on the image quality—both the grain mentioned previously as well as a whole ton of contrast. So much contrast, in fact, that high-ISO film images could sometimes look like abstract art. Imagine a grainy image with very little detail in the shadows and highlights—and none available to be pulled from the negative. That just doesn’t hold true today when working with RAW files. RAW is especially capable of rendering detail in very dark shadows, and the only processing that eliminates shadow detail comes from underexposed files. If you can overexpose a digital image even slightly, you’ll be amazed at the detail that remains in the dark tones without any contrast gain at all.
 |
3. High-ISO performance matters even at low ISOs.
You only shoot at ISO 400 or less, so why should you care about better performance at higher ISOs? Because those low-noise/high-detail qualities are carried across the entire ISO sensitivity range. In layman’s terms, ISO 400 from today’s D3 looks a lot like ISO 100 did in the D1 of yesterday. If you like image quality, you like to see advances in ISO capabilities due to better signal-to-noise ratio. Those gains will show up in your low-ISO images too. So when you hear of new cameras reaching new high-ISO low-noise heights, it’s good news for you too.
You only shoot at ISO 400 or less, so why should you care about better performance at higher ISOs? Because those low-noise/high-detail qualities are carried across the entire ISO sensitivity range. In layman’s terms, ISO 400 from today’s D3 looks a lot like ISO 100 did in the D1 of yesterday. If you like image quality, you like to see advances in ISO capabilities due to better signal-to-noise ratio. Those gains will show up in your low-ISO images too. So when you hear of new cameras reaching new high-ISO low-noise heights, it’s good news for you too.
4. Sometimes it’s better to choose a higher ISO even if you don’t have to.
Generally speaking, this one appears as if it might be awful advice. But let’s say it’s a fairly low-light situation in which you’re working, and you need a fast shutter speed of 1/125th of a second to keep the subject from blurring. The lens only opens to ƒ/4 and you’ve maxed it out, and you’re at ISO 400. Still, you’re just barely getting the correct exposure. One way to ensure you’re getting an even better exposure is to boost the ISO to ISO 800. Why? Because if you capture RAW you’ve got the added benefit of being able to pull extra detail out of shadows from slightly overexposed image files. That can produce an image with more detail across the spectrum from shadows to highlights. As long as highlights aren’t blown out in the capture, an overexposed RAW file will actually produce a higher-quality file after image processing than a “correctly” exposed RAW file would.
Generally speaking, this one appears as if it might be awful advice. But let’s say it’s a fairly low-light situation in which you’re working, and you need a fast shutter speed of 1/125th of a second to keep the subject from blurring. The lens only opens to ƒ/4 and you’ve maxed it out, and you’re at ISO 400. Still, you’re just barely getting the correct exposure. One way to ensure you’re getting an even better exposure is to boost the ISO to ISO 800. Why? Because if you capture RAW you’ve got the added benefit of being able to pull extra detail out of shadows from slightly overexposed image files. That can produce an image with more detail across the spectrum from shadows to highlights. As long as highlights aren’t blown out in the capture, an overexposed RAW file will actually produce a higher-quality file after image processing than a “correctly” exposed RAW file would.
Some might say boosting the ISO offsets any noise gains that come from overexposure, and that could very well be true. But in terms of shadow detail, there’s no doubt: the extra detail that can be pulled from brighter shadows is awesome. This holds especially true in low-key images full of dark tones where you’re more likely to keep from blowing out highlight detail.
Focal Length Facts Digital Photography Tutorials
In the good old days there wasn’t much to know about lens focal lengths. A 100mm lens was a 100mm lens; the only thing you needed to know was whether that lens was a telephoto (as it would be on a 35mm film camera), a normal lens (like on a medium-format camera) or a wide angle (as it would be on a 4×5 view camera). Most people quickly learned what the focal lengths represented for their particular camera format. But these days, with so many digital camera sensor sizes and other lens peculiarities, the millimeter measurement of a lens’ focal length tells only part of the story. Many other factors go into determining the effects a particular lens will produce—from magnification factor to zoom range and much more. What follows is a lens focal-length primer, with several key points that will help you understand focal lengths as they relate to your camera and to the pictures you use them to make.
1. The focal length of a lens is the measurement of the distance from the center of a lens to the point at which its image is focused. The longer the distance, the longer the lens. The longer the lens, the more telephoto it’s considered. The shorter that distance, the wider the angle of view. The most common measurement of lens focal lengths is in millimeters, although some old-school photographers still refer to large format lenses in inches. (If you’re interested, you roughly can convert inches to millimeters by using a 1:25 ratio. An eight-inch lens approximates a 200mm lens.)
2. A full-frame digital sensor is equivalent in size to a 35mm film frame, making this the standard focal length baseline that today’s lenses are measured against. Smaller formats often have shorter focal lengths (say, a 10mm wide angle that seems unbelievably short) but in “equivalent” terms they’re much more akin to more familiar focal lengths (say, a 17mm lens that is the equivalent to a 28mm lens in 35mm equivalent terms).
3. Lenses have various classifications based on focal length and the field of view they provide. A wide-angle lens provides a much greater field of view, and is generally considered to be any lens 40mm or shorter (again, in full frame equivalent terms). A normal lens—on a full frame DSLR—is the distinction given to any lens that ranges roughly from 40mm to 65mm or so. These lenses are “normal” because they provide an angle of view that approximates that of the human eye. Telephoto lenses on full-frame cameras usually are lenses longer than 70mm, and they range upwards of 300, 600 and even 1000mm. The longer the telephoto, the narrower the angle of view and the greater the magnifying power it provides. That’s why wildlife and sports photographers so often use 600mm and longer telephotos. Most amateur users, though, tend to top out around 300mm lenses for most uses.
4. The effect that a smaller sensor has on a lens of a given focal length is called a crop factor or magnification factor. This is because a smaller sensor produces a similar effect to cropping a larger sensor—effectively magnifying the image. Some photographers object to this narrowing of the angle of view because they’re used to a lens of a certain focal length producing a certain corresponding angle of view. Other photographers actually prefer a crop factor because it has the effect of making a long telephoto lens behave like an even longer telephoto lens. If you photograph sports or wildlife, a 400mm lens placed on a camera with a 1.5 magnification factor would behave more like a 600mm lens. That’s a heck of a telephoto bonus.
 |
5. Some lenses are called prime lenses, which means they have a fixed focal length. Other lenses are zoom lenses, so they can be adjusted across a range of focal lengths. Some zooms fit within a particular classification, such as wide-angle zoom, normal zoom or telephoto zoom. Many lenses actually zoom from wide to normal, or normal to telephoto. Extreme zoom lenses actually encompass all these qualities in a single lens—say a wide-angle 30mm lens that can zoom all the way to a 300mm telephoto. These extreme zoom lenses are prized for their portability since they offer such a wide range of focal lengths in a single package. The downside is that some extreme zooms are more prone to vignetting and chromatic aberrations when used with wide apertures and zoomed to the extremes.
6. Photographers shopping for point-and-shoot or compact cameras often encounter zoom lens descriptors such as 2X, 3X or 10X. This isn’t actually a representation of the precise focal length of a lens, but rather the zoom range that lens covers. A 2X lens, for example, doubles its focal length from its widest to its longest setting—as in a 35-70mm lens. A 3X zoom triples the focal length (like 35-105), and a 10X zoom multiplies it by a whopping factor of ten (as in a 35-350mm lens). The bigger the X factor, the larger the range of focal lengths covered by a lens. Remember though, just because two lenses offer 2X zooms doesn’t mean the lenses have the same focal length. For that, you’ll have to compare actual millimeter measurements in 35mm equivalent terms.
7. The longer the focal length of a lens, the shallower the inherent depth of field that lens will produce. The shorter a lens, the greater the depth of field will be even at wide apertures. In practice that means you have to be more precise when focusing a telephoto lens, whereas wide- angle lenses have such depth of field they can be very forgiving of improper focus. Many photojournalists for years have utilized this “benefit” of wide-angle lenses in difficult shooting environments, not only because they take in more of the scene and provide context, but because they have so much depth of field to provide focus from near to far.
8. The longer the focal length of a lens, the more difficult that lens will be to handhold. This is true not only because longer lenses tend to be physically longer and heavier than wide-angle lenses, but also because subtle vibrations and camera shakes are amplified dramatically when using a telephoto lens. A good rule of thumb is to use a minimum shutter speed equivalent to the focal length—for example, when handholding a 500mm telephoto lens, be sure to set the shutter speed no slower than 1/500th of a second.
9. Some lens designations mean that even though the focal length may be the same, the lens won’t perform the same. A macro lens, for instance, can focus extremely close, allowing for great magnification of small objects and fine details. One 100mm lens may be designated macro, while another is not. You’re bound to pay a premium for the added capabilities, but if making big photos of little objects is important to you, it’s well worth the investment.
10. Many photographers utilize special devices to change the effective focal length, or at least the performance, of a lens. Teleconverters are popular among wildlife photographers and those who want to double or triple their lens’ focal length (with a 2X or 3X teleconverter) without carrying an additional, and often quite expensive, supertelephoto lens. Extension tubes are a similar device, but rather than changing the lens’ effective focal length they simply change the focusing range—making a lens focus much closer and behave more like a macro lens would. Like macro lenses, extension tubes are used to allow close focusing are ideal for flower photography and other close-up uses. The downside with both extension tubes and teleconverters is that each requires a sacrifice in available maximum aperture—often as much as two full stops that turn an ƒ/2 lens into an ƒ/5.6. Worth it, though, if you’re working at smaller apertures, with flash or if you simply need the close focusing or telephoto extension effect.
Wedding Photography; Two “Camps” Of Style And Vision
There was a time when all wedding photography was pretty much the same. Well-trained photographers worked from “shot lists” and used high-end, medium format equipment. They took wedding portraits (many in-studio) whose hallmarks included great color, sharp details, beautiful lighting, and well-posed subjects.Wedding albums were filled with 8×10”, 8×8”, and 5×7” prints of carefully posed images of couples, their families, and the bridal party, all smiling nicely for the camera. These traditional photographers often took charge at the wedding and everything unfolded on their timetable so each shot would be as perfect as possible. The wedding party also spent considerable time posing for photos before, during, and after the event.
|
The less-controlled photojournalism style took hold about 12-15 years ago when photographers such as Denis Reggie and Bambi Cantrell began to photograph weddings like photojournalists, often using 35mm cameras. They captured the event as it unfolded without asking people to pose or stop and smile for the camera. There are no hard and fast rules for “wedding journalism” as it is all about documenting the day in an informal/artistic manner. Wedding journalism—and digital cameras—also opened the door for many more photographers, some as skilled as the traditionalists, some not, which created more competition for photographers, but also more options for the public.
Two Camps?
Today, when describing their photographic style, wedding photographers typically label themselves as either photojournalists or traditionalists. Former newspaper photographers Andrew Niesen and Rachel LaCour Niesen, co-owners of Atlanta-based wedding studio LaCour (www.lacourphoto.com), and creators of ShootQ (www.ShootQ.com), a studio management solution for photographers, made the switch from news journalism to wedding journalism in 2001. Their approach to photographing a wedding is the same as a news event, which is to follow the story as it happens and allow it to unfold before their eyes. The couple document weddings in real time using a hands-off approach, which, Andrew notes, is the closest thing to their training.
Today, when describing their photographic style, wedding photographers typically label themselves as either photojournalists or traditionalists. Former newspaper photographers Andrew Niesen and Rachel LaCour Niesen, co-owners of Atlanta-based wedding studio LaCour (www.lacourphoto.com), and creators of ShootQ (www.ShootQ.com), a studio management solution for photographers, made the switch from news journalism to wedding journalism in 2001. Their approach to photographing a wedding is the same as a news event, which is to follow the story as it happens and allow it to unfold before their eyes. The couple document weddings in real time using a hands-off approach, which, Andrew notes, is the closest thing to their training.
| ||
“We feel the pictures we’re making are really treasured by the families even though [the images] have a very small audience as opposed to magazines. We really feel we are doing something very important for our clients.”
Though the way they earn their living has changed, the Niesens say their photographic style has not, except for some minor tweaking. For instance, they’ve adapted their approach from pure photojournalism—where it’s all about the moment—to photojournalism that’s something their clients want. “With photojournalism,” Rachel explains, “we were capturing top news events and dealing with a wide range of subject matter. We realize that sometimes the more bizarre ‘artistic images’ that we appreciate as photojournalists may not be appreciated by many of our clients.”
|
The Niesens originally pursued photojournalism as a career so they could be witnesses on the front lines of history. However, they feel good about trading their front row seat to world history for a smaller one in family history. “In a lot of ways it’s just as powerful and more meaningful work because each family will treasure those photos for generations,” Rachel concludes. “It’s a special feeling to know the pictures we’re making for our clients will be used as a foundation for their family legacy for generations.”
Robert Lino (www.robertlino.com), a portrait and wedding photographer for the past 35 years, believes the more traditional style lost favor when it became overly complicated. There were too many complex backdrops and too much time was spent in the studio away from the wedding. “I believe that’s one reason the photojournalism style became so popular,” Lino reiterates, “because brides didn’t want to spend the whole night in front of a painted background.”
Lino says his work can be described as formal and elegant, with feeling. “My images are very controlled and very directed in order to look very natural,” Lino explains, who says he developed his style partly through observation.
 | |
|
“I also learned from the masters and all the photographers who broke the rules; but I gave it my own twist and my own interpretation.
“For many years people hired professional wedding photographers. Now, we’re in an era where anybody can shoot a wedding.” Lino believes taking a little more care with images, such as making sure the couple holds the knife correctly when cutting the cake, and taking a few formal pictures in front of a nice background (not a backdrop, but a pretty window, etc.), would go a long way in getting people to hire professionals instead of having a bunch of people with decent cameras shooting thousands of pictures in the hopes of capturing 20 good ones.
 | |
|
Lino does credit photojournalists for educating consumers about the kinds of images they should have. “Many years ago,” Lino says, “the average bride would not buy a picture where she was not facing the camera smiling. But photojournalists promoted the idea that they needed photographs of the cake, flowers, and shoes, because they’d spent a lot of time and money on the details. In the past wedding photographers thought they had to be either extremely journalistic or extremely traditional, but now they’re beginning to realize there is a happy medium between the two styles that provides complete coverage of the event.”
Your Style, Your Viewpoint
Though most wedding photographers lean toward either the traditional or journalistic approach, it’s still important to develop a style that sets you apart from the crowd. Unfortunately, many photographers photograph using someone else’s style because they don’t have confidence in their own. Photographer Tony Hewitt (www.tonyhewitt.com) states, “Your viewpoint is something no one else in the world shares.
Though most wedding photographers lean toward either the traditional or journalistic approach, it’s still important to develop a style that sets you apart from the crowd. Unfortunately, many photographers photograph using someone else’s style because they don’t have confidence in their own. Photographer Tony Hewitt (www.tonyhewitt.com) states, “Your viewpoint is something no one else in the world shares.
 | |
|
“Yet so many people coming into the industry think if they can copy so-and-so’s work to a ‘T,’ then they will be a good photographer. But the best photographers are the ones who break free and have their own vision, which becomes the one others want to copy. A photographer’s role is to show the rest of the world how they see.” Hewitt says photographers need to develop their ability to see what others don’t, and to trust that theirperspective is unique. “The challenge as a photographer is to express that unique perspective through skill, technique, and equipment.”
Weddings have a lot of things in common—a ceremony, a first dance, a cake, etc. Weddings may seem repetitive, but they’re really not. These differences are where a photographer can excel. Hewitt says the unique thing about every wedding is the chemistry between the couple, and if you can focus on that chemistry, you will find the source of creativity for that wedding.
|
For inspiration, Hewitt looks at the work of colleagues both inside and outside the industry, at his daughter’s Facebook pictures, television, fashion magazines, and art and makeup advertisements. By looking at images from a wide cross section of the marketplace, Hewitt can see how the market changes and evolves. In the end, Hewitt says, when people are looking for a photographer, they will buy the person before they’ll buy the style, technique, reputation, and awards. “I truly believe that. All those things may lead them to you, but the interaction and the way they feel around you will be the major factor behind their decision. Very few brides want to be around someone who makes them feel uncomfortable.”
|
Lino also advises photographers, especially newcomers, not to follow trends or to copy other people’s styles—and don’t be too concerned about the competition, as there’s enough work to go around. “Stay focused on your own business and developing your own style because a time will come when people recognize your style and seek you out. It’s also a time when price or location does not become the determining factor in booking you,” Lino concludes. “You’ll know when your style is really working when clients call and ask if you’re available for a certain date before they ask how much you charge.”
Analog vs. Digital

When we examine legendary photographers like Ansel Adams, we realize that, by today’s standards, the equipment they used was more of a handicap than a secret ingredient. Half a century ago, serious photographywas performed in black-and-white, with a great deal of patience and deliberateness using a 4×5 (or larger) view camera on a sturdy tripod. Images couldn’t be reviewed until after the film was developed—and then, initially, as negatives. Today, we shoot digital images in millions of colors at 10 frames per second and edit the “keepers” while still at the scene.
The two approaches resist comparison. It’s difficult to derive objective, scientific understanding when we compare film-based, silver-halide photography to digital imaging. The technology someone like Adams used 50-plus years ago when he was exploring Yosemite has little in common with the technology used by a modern professional shooting with a Canon EOS-1D Mark IV, a Nikon D3S, an Olympus E-3, a Pentax K-7 or a Sony Alpha 900. In many ways, it’s like comparing painting with a brush and monochrome palette to spray painting with every color in the rainbow. In other words, almost every element is different.
 |
More Variables
During the reign of silver-halide photography, the type of film and how it was processed made all the difference in the world. Even if a scene was predetermined to be shot in black-and-white, there still were many choices to be made—film speed, brand, spectral response, grain structure, format and, in some cases, emulsion batch. Matching the appropriate developer to the film was another huge challenge, and results varied widely depending on the choices made.
During the reign of silver-halide photography, the type of film and how it was processed made all the difference in the world. Even if a scene was predetermined to be shot in black-and-white, there still were many choices to be made—film speed, brand, spectral response, grain structure, format and, in some cases, emulsion batch. Matching the appropriate developer to the film was another huge challenge, and results varied widely depending on the choices made.
But in truth, it didn’t end there; that was just the beginning. Photographers had to decide more variables—the right combination of developing time and developer temperature, for instance. How much agitation? Swishing the film around too much during development could block shadows, cause streaks or blow out highlights. What type of stop bath to arrest the development process? Could the fixer (sodium thiosulfate) dissolve grain size and, if so, how soon should the film be rinsed clean? And keep in mind that nearly the entire process had to be conducted while the film was in absolute darkness. Last but hardly least, film was fragile and could be irreparably damaged by careless handling.
We’ve succeeded at making things easier today. Not to diminish the skill and accomplishments of today’s digital photographers, but zipping through RAW images by clicking a few presets can’t even begin to compare with the intense labor required to coax the full dynamic range from a 4×5-inch black-and-white negative while making a contact print on sensitized paper. Once again, the variables were overwhelming—paper type, developer, exposure time, dodging and burning, etc. It’s a miracle that so many wonderful, masterful prints were created under those circumstances.
Clearly, we’ve gained so much by going digital. Digital photography is immediate. It has given us the ability to replicate images with 100% accuracy and consistency, and has dramatically created new avenues to share images. And perhaps the biggest gain of all—the technology has expanded the art form and has enabled hundreds of thousands of people to create high-quality results with little or no formal training.
But we’ve lost some things, too—at the very least, some of our ability to visualize how a scene will appear as a monochrome print. Thanks to the immediate feedback provided when we review images on a three-inch LCD, we no longer require that level of perception. We’ve also become less deliberate. We can shoot and shoot, and even fill cards with 1080p video at 30 fps, and then delete 95% later. In the old days, every shot counted. Today, the question is less about what to shoot and more about which images to keep.
Getting Digital Colors Right
When film was the medium of choice for photography, and transparency film, in particular, color management was something that the lab took care of by making sure your slides were processed in good chemistry at the right temperature and by using your filter of choice on your lens. If you took your film to a good lab, you got predictable results. With digital technology, to get your best output, color calibration is a necessity.
When film was the medium of choice for photography, and transparency film, in particular, color management was something that the lab took care of by making sure your slides were processed in good chemistry at the right temperature and by using your filter of choice on your lens. If you took your film to a good lab, you got predictable results. With digital technology, to get your best output, color calibration is a necessity.
Calibration ensures that the colors you record in-camera are the same colors that display on the monitor and, in turn, the same colors that you get in your print. If the system isn’t calibrated, predictable results are difficult, if not impossible, to achieve, and you’ll waste time, energy and money trying to fine-tune your prints. With products from companies like Datacolor and X-Rite, “what you see is what you get.”
Aperture and Shutter Priority | Photography Tutorial
The Missing Pages column is a collection of all of the information that should have been included in your camera’s Owner’s Manual—but somehow got left out. This is a hybrid assortment of short articles that delivers the know-how you need to derive the maximum enjoyment—and creative expression—from your equipment.
It’s sort of a juiced-up User Guide for creative people who are not necessarily technical. Each part will teach you how to use one of the camera features or functions that you previously ignored or left set on Auto. And each will include a Creative Project so that you can try some scripted experimentation.
We will explain complex technical subject matter a way that everyone can understand. And if you happen to be a technical expert yourself, we’re including “Nerds Only” sidebars just for you. That way you can dig in deep—or just straddle the edges—of the technological stuff. It’s your decision.
Installment III: Aperture & Shutter Priority
Definition: exposure modes that provide more control than Program AE but less than Manual mode.
Shutter Priority is an auto exposure system in which the camera achieves correct exposure by selecting the aperture after the user has selected the shutter speed.
Conversely, Aperture Priority is an auto exposure system in which the camera achieves correct exposure by selecting the shutter speed after the user has selected the aperture.
Each system has its own set of distinct advantages and disadvantages. But to fully understand Aperture Priority and Shutter Priority you must understand the fundamentals of exposure. Please refer to the preceding segment (Program AE) if you need a quick review.
Today’s digital SLR cameras (and a few high-end compact models like the Canon PowerShot G10) offer both Aperture Priority and Shutter Priority automatic modes in addition to Program AE. There was a time, however, back during the era of Canon AE-1 popularity, that 35mm film cameras offered one autoexposure system or the other. And each method had its own passionate group of proponents—and detractors.
The Canon (Shutter Priority) crowd argued that it was better to set the camera’s shutter speed and allow the camera to respond by setting the appropriate f/stop. They claimed—and rightfully so—that by choosing a fast shutter speed it was easier to control camera shake and to stop subject movement. Minolta, Nikon and Pentax (Aperture Priority) followers insisted that setting the aperture was the preferred procedure because it gave the user full control over the depth-of-field and allowed the user to preselect the optimum aperture for any lens.
Both sides were correct, of course, each in their own way. In retrospect, this issue was one of the most polarizing disputes among camera enthusiasts, no pun intended. One might have expected a different outcome to this hotly debated argument, but the final result was the development of Program cameras that set BOTH the shutter speed and aperture, essentially leaving the user out of the equation almost entirely. Better cameras offered all three: A mode, S mode and Program AE. The Minolta XD-11, which debuted in 1977, was the first camera that could claim “Dual Mode” by offering both A and S modes.

Use Aperture Priority to control the background.
Aperture Priority
Sometimes called “Aperture Preferred” because that term more accurately describes what’s in the user’s mind when they make decisions about the camera settings; and labeled “Av” (Aperture Value) by Canon and others; Aperture Priority allows the user to control depth-of-field (that zone of sharpness that extends in front of and behind the actual point of focus). Because it’s often indicated by an “A” on the control dial, some people mistake the setting for “Automatic.”
Having control over the DOF is very important in more situations than not. When shooting portraits, for example, it’s desirable to force the background to blur by using a large aperture. This effect separates the subject from what’s behind them and gives the appearance of accentuated sharpness. It also allows you to deemphasize distracting backgrounds by making them fuzzy and indistinguishable. Controlling DOF is similarly important when you want a larger zone in focus (greater DOF), such as when shooting close-ups or certain landscape scenes.
Controlling the aperture allows you to select the “sweet f/stop” that delivers the sharpest images. There are rare exceptions, but most lenses perform better when stopped down two or three f/stops. A 50mm f/1.4 Nikkor, for example, will yield better results at f/4 than it will at f/1.4. And contrary to intuitive logic, using an f/stop like f/22 that’s quite small introduces diffraction, which robs the image of sharpness, despite the extended depth-of-field.

Use Shutter Priority (and a high shutter speed) to stop action.
Shutter Priority
Known as “Tv” to Canon (for Time Value), there’s a lot to be said about the efficacy of this system—particularly in light of the fact that all camera makers recognize the detrimental effects of camera shake and are moving toward some sort of Image Stabilization to reduce it.
In S Mode, you set the shutter speed and the camera does the rest. Well, not quite. The argument that the Aperture Preferred crowd often made was this: if you set a shutter speed that’s too high (1/250s indoors, for example) you’re likely to get no picture at all. As a countermeasure, many cameras will warn you and then shift to a slower speed when it’s impossible to achieve correct exposure at the speed you selected. And some will even adjust ISO (although that’s really a case of relinquishing control over the final outcome to the camera and hoping for the best).
Controlling the shutter speed means you can help prevent camera shake and more importantly, freeze subject movement. If you’re shooting a track and field event, for example, or a little league game, you can use a very fast shutter speed to stop motion.
This theory works well indoors, too. For any given lens you should know the minimum shutter speed you can successfully handhold without shake. I call this the “SBA” or “Shake Begins At” shutter speed (ungrammatical but easy to remember). With a 50mm lens equivalent, for example, most people can shoot at 1/60 of a sec or so. General rule of thumb is “1 over the focal length” as in the fraction 1/focal length. So the equivalent to a 135mm lens would require a shutter speed of about 1/125 or higher for safe, jiggle-free results. (Remember that this old rule came to be before digital, so you must account for the lens multiplier when calculating.) In Shutter Priority you can set the camera at your SBA and blaze away with little fear of camera shake.

A Mode allows you to control Depth of Field.
Creative Project
Do you have a favorite lens? One that always seems to yield the sharpest images? With that go-to lens in mind, what range of apertures delivers the absolute best performance? You really need to know. For the sake of having an example, let’s say you’re a Nikon D90 shooter and your favorite lens is the 50mm f/1.4. (Not a bad choice, by the way, in that it translates to a 75mm f/1.4 on your DSLR, which gives you a nearly perfect portrait lens).
Exercise 1
Get out the tripod, find a subject with detailed texture, and set up ten to fifteen feet away. If you can’t think of anything better, aim your camera at a painting that’s hanging on a neutral wall. Shift your camera into Aperture Priority mode and begin shooting at the largest f/stop, working your way down to the smallest. How do the images in the series compare in terms of sharpness?
You may find that your results resemble these: Wide open at f/1.4 you get good results, but stopped down to f/4 or f/4.5 (the half stop between f/4 and f/5.6) the lens really shines. Sharpness remains until around f/16 where diffraction takes over and the results—while still acceptable—are not as biting-sharp as at f/5.6 or f/8.
Exercise 2
For the second exercise, position a human subject five feet from the painting and ten feet from the camera. Repeat the exercise above, keeping the camera focused on the human. This time when you examine the results, closely look at how the subject becomes more separated from the background as depth-of-field decreases.
Exercise 3
Don’t freeze the action all of the time. Movement can add dramatic emphasis to the dynamic flow of a river, for example. You’ll need the tripod again. If you don’t have a gushing waterfall handy, moving traffic (especially at night), frenetic musicians (especially during the wee hours) or typical preschoolers (after a sugary snack) will provide enough subject movement to make this test worthwhile. In S mode, select a very slow shutter speed—one-half second or longer, unless it’s so bright that you’ll overexpose. Make sequential exposures at progressively faster speeds until you reach the speed that completely stops all subject movement. Then compare the results in your favorite image editor.
What about M mode? M stands for Manual, of course. That’s a great Creative Project but that’s for another episode!
For Nerds Only
What’s Pi got to do with f/stops? And why is f/2 twice as big as f/2.8 and four times larger than f/4? Shouldn’t bigger numbers mean bigger apertures?
Shutter speeds are pretty easy to understand. 1/100 of a second is obviously half as long as 1/50 of a second. But when it comes to f/stops nothing seems to make sense. That’s because an f/stop is a fraction. It’s the ratio between the lens’s focal length and the diameter of the active aperture. For example, a 50mm lens that is set at f/2 has an aperture that is 25mm in diameter. Similarly, a 50mm lens that is set at an aperture that is 8.9mm in diameter is said to be set at f/5.6 (i.e., 50/8.9 = 5.6).
Remember high school algebra? I’m sure many photo.net readers will want to jump in here and untangle my amateur math, but here’s what I remember. To calculate the area of a circle one multiplies the radius times the radius times pi. Or in other words, the radius squared multiplied by the constant 3.14159.
If you’re still with me, look at the following table.
For a 50mm lens:

So, it’s (fairly) easy to see why f/2 is about twice as large as f/2.8. The area is about twice as large. As we go down the scale, each increment of one f/stop equals a 2X change in exposure because the area becomes half as large. That is to say, each subsequent f/stop is one-half as large as the preceding f/stop. Half of a half is a quarter, so the difference between f/4 and f/8 is two stops, or 4X.
Why use such a goofy system? Because it can be applied to a lens of any focal length. For the purposes of calculating exposure, a 135mm lens set at f/5.6 delivers exactly the same amount of light as a 300mm lens at f/5.6. Were it not so, it would be virtually impossible to base camera exposure settings on an external handheld light meter.
Photography Basics Tutorial
Ever wonder what it is that actually makes a camera work? This tutorial will cover the inner workings of a camera, and introduce you into photography basicsand the expansive world of taking betterphotographs.
To take beautiful photographs you do not need an expensive camera and a bag full of equipment. What is important is the photographer’s ability to see his/her surrounding and use knowledge and personal feel for the subject.
Being the first article in a series, this lesson is meant to only cover the basics of photography. The idea with this series is to get people more interested in photography, awaken creativity and hopefully help people enjoy this hobby even more. The community here at Tutorial9 is an important part of this series and I would love to hear your feedback and questions.
An introduction to Photography
 The word “photography” is French but is based on Greek word and literarily means “drawing with light“. That’s what photography is all about, without light — no photograph. The art of photographyis basically seeing and balancing the light.
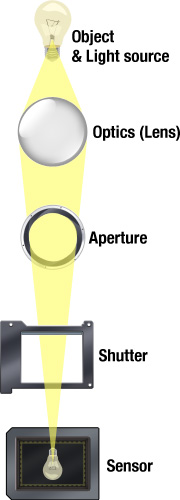
The illustration to the left shows the path the light travels from the object to the sensor (or film in non-digital cameras).
First the light needs to go through the lens, which is a series of differently shaped pieces of glass. If the focus is good then the light will meet on the sensor.
The aperture is placed inside the lens and is basically an opening that controls how much light reaches the sensor.
On most modern cameras the shutter is placed inside the camera body. This piece of mechanics is what controls how long time the sensor is exposed to the light.
The sensor is a very sensitive plate where the light is absorbed and transformed into pixels. As you can see on this illustration, the image the sensor picks up is actually upside down, just like our eyes sees the world, the processor inside the camera then flips it.
Aperture
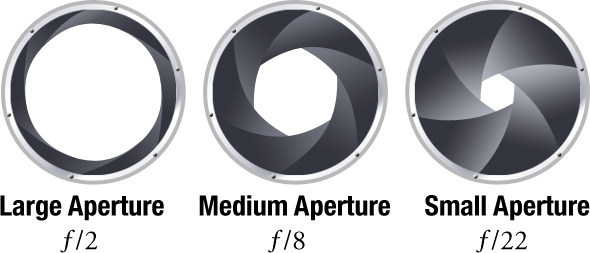
The aperture sits inside the lens and controls how much light passes through the lens and onto the sensor. A large aperture lets through very much light and vice versa. Knowing how the aperture affects the photograph is one of the most important parts of photography — it affects the amount of light, depth of field, lens speed, sharpness and vignetting among other things. I will talk more about these things in later parts of this series.
F-numbers, a mathematical number that expresses the diameter of the aperture, are an important part of understanding how the aperture and exposure work. All f-numbers have a common notation, such as ƒ/5.6 for an f-number of 5.6. There are a set numbers of f-numbers that are used in photography, there are several different scales but the “standard” full-stop f-number scale is this:
ƒ/# 1.4 2 2.8 4 5.6 8 11 16 22 32
These are known as full-stop f-numbers. If you decrease the f-number with one full-stop, like ƒ/4 to ƒ/2.8, the amount of light that passes through will double. If you increase the f-number with one full-stop, like ƒ/5.6 to ƒ/8, only half the amount of light will reach the sensor.
There can be several f-numbers between the ones above — depending on what scale is being used. The most common one is a 1/3 scale, which means that every third step is a full-stop, and thus giving you two settings between every full-stop. For example between ƒ/8 and ƒ/11 you will find ƒ/9 and ƒ/10. This can be rather confusing at first, so here’s a short reminder:
A higher f-number = a smaller aperture = less lightA lower f-number = a larger aperture = more light
Shutter

The shutter is what controls how long the sensor is exposed to the light. The longer the shutter is open the more light can be captured by the sensor. A fast shutter speed will result in “freezing” a moving object and aslow shutter speed will let you capture the motion of a moving object.
There is a scale of stops for the shutter speeds just like for the aperture, below are the full-stops.
1/1000 s 1/500 s 1/250 s 1/125 s 1/60 s 1/30 s 1/15 s 1/8 s 1/4 s 1/2 s 1 s
And just as with the aperture, the shutter speed is often on a 1/3 scale, giving your two steps in between every full-stop. For example between 1/60s and 1/125s you will find 1/80s and 1/100s.
The two primary factors which control exposure are shutter speed and aperture. We will cover these things in greater detail in other lessons.See [LINK TO EXPOSURE TUTORIAL] for an article on how exposure works.
ISO
The ISO speed (the name comes from the International Organization for Standardization) is a measure of the film speed, or its sensitivity to light. With digital cameras the ISO affects the sensor instead of the film, but the principal is the same. A low ISO speed requires a longer exposure and is referred to as slow, a high ISO speed requires less time to give the same exposure and is therefore referred to as fast. One step in the ISO equals one full-stop, so the ISO is not on a 1/3 scale — film can be found with 1/3 ISO speeds, but it’s uncommon in the digital world. These are the most common ISO speeds.
ISO 50 100 200 400 800 1600 3200
On 35mm film, a film with high ISO speed had much more grain than a slower film — but the modern sensors don’t create the same grain with high ISO speeds. Instead it creates noise. The digital noise is not as favorable as the film grain and can destroy a photo if it’s too visible (the same goes with the grain, but it’s effect was more subtle and often more liked).
If light is no problem, then always use a low ISO number but if you’re indoors with bad light or other conditions when you find the combination of aperture/shutter not to be enough the ISO speed can be a great asset. New digital sensors are constantly developed and the noise levels with high ISO speeds are decreasing with every new release.
Taking Great Photos in the Dark
Follow these seven helpful tips to improve your night photographs.
Shoot During Dusk
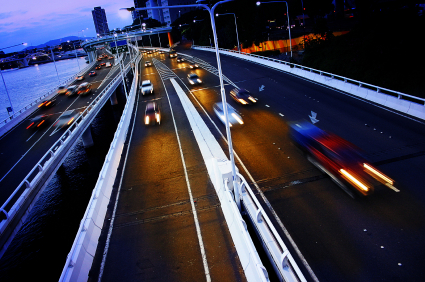
Some of the best night photos are taken during dusk; when the sky isn’t completely black. Taking pictures during dusk will show more colors and details in the distance and will let you use a faster shutter speed.
Use High ISO
Use a high ISO if required. It is better to get recognizable photos of your friends that are grainy than blurry photos. You can reduce noise with image editing software but you can’t remove blur.
Keep it Steady
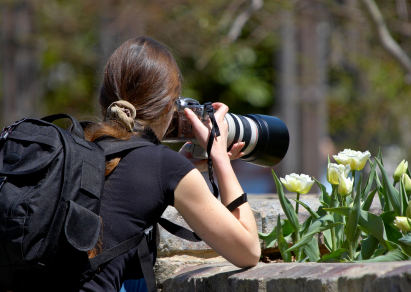
Taking photos at night requires slow shutter speed. To shoot bright pictures without the blur at night, use a tripod or monopod to keep your camera steady.
In addition to using a tripod or monopod, enable your cameras mirror lockup setting and gently press the shutter. If your camera doesn’t have mirror lockup, you can use the self timer mode instead.
If you don’t have a tripod or monopod with you, find some support objects to keep your body and arms stable. For example, you can lean on a wall or place your elbows on a table to keep your arms steady. If there’s nothing to help keep you steady, stand with your legs far apart from each other and hold your breath while taking the picture.
Motion Blurs
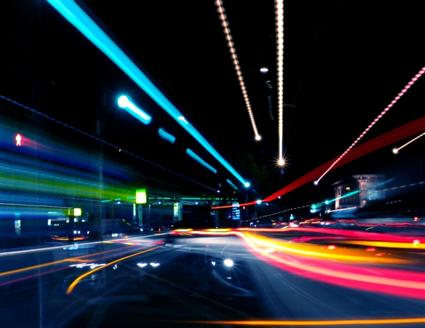
Not all blurs are bad. Some blurs such as motion blur can add interest. Try shooting photos of moving objects, or deliberatly move your camera to create a motion blur. Zooming in while the shutter is still open will also add an interesting forward-motion effect.
Freeze your Friends
When taking photos of your friends at night, combine flash with a long exposure. The flash will freeze the foreground and the long exposure will reveal the background. Because people tend to move right after they see the flash, set the shutter curtain sync to the second curtain (Usually in the custom functions settings). This will fire a flash just before the shutter closes instead of in the beginning. Using second curtain sync will also put your friends in front of any motion blur so nothing is covering their faces. Second curtain sync is available in most new digital SLR cameras but rarely seen in point and shoot cameras.
Shoot for High Dynamic Range (HDR)
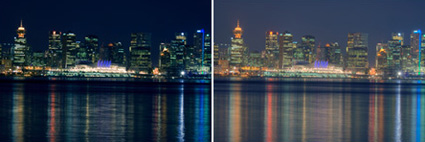
Place your camera on a tripod and shoot three exposures: one darker, one lighter, and one just in the middle. Your camera may have auto exposure bracketing to help you with this. Load the images into Photoshop and create HDR file out of the three exposures. Now you have a HDR image that you can apply tone mapping to to reveal more details. Tone mapped night photos can give results similar to shooting during twilight with more post-processing control.
Shoot Several and Stack
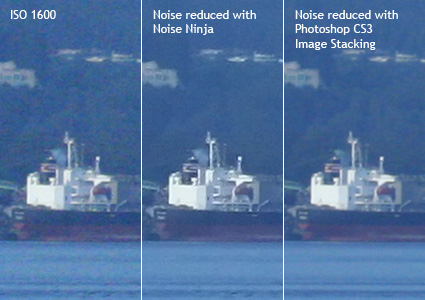
Sometimes when you shoot long exposures, noise and hot pixels will appear even at the lowest ISO setting. To overcome this problem, shoot the same photo a few times (more is better), and use Photoshop CS3 image stacking to combine the analyze the image to remove noise and hot pixels.
- Start Photoshop CS3.
- Open the File> Scripts menu and choose Load files into Stack
- Click the Browse button and load all the images.
- Checkmark the “Create Smart Object after Loading Layers” and click OK.
- Open the Layers> Smart Objects> Stack Mode menu and choose Median.
Create a Sunshine Effect in Studio with Artificial Sunlight
In this tutorial video we’ll give you tips on how to cheat Mother Nature and show you How to Create Your Own Sunshine in the Studio.
Sunshine always evokes warmest emotions when we look at the image. Sunny day associates with pleasant emotions caused by increase of vitamin D3 that is produced in the skin when 7-dehydrocholesterol reacts with UVB. However our mind can trigger positive emotions just by anticipating the drug (vitamin D). If an image with sunshine can make us happier, how about photographing sunshine indoors on a rainy day?
Ideal lighting scenario outdoors would be morning or evening light with some puffy clouds to create good mid-tones and beautiful highlights.
Conceptual breakdown:
a. Sun:Direct source of hard light = clamp lamp with clear bulb
b. Time of the day: 6pm early evening = position clamp lamp at a low angle
c. Clouds:Diffusion = Roll of Drafting Vellum
d. Sunlight picking through the clouds: cut a hole in the drafting vellum
e. Now that you have control of the sunshine you can even go grab a sandwich and the sun will be there when you return. (that’s what I did)
Extras (if desired):
a. Use a fill-light or bounce-light from the front of your subject to soften hard shadows caused by direct light.
b. Use Selective focus. Shallow Depth of field often helps to make your photograph more interesting. And to draw viewers eye to particular part of the image.
Final Shot:

Equipment and sets:
DSLR camera, 17-85mm lens,Tripod, Surface, Background, Two clamp lamps on light stands, Roll of diffusion vellum on Boom arm, White foam-core board clamed to a light stand
Camera Settings:
Av mode, 85mm, f5.6
Professional Lighting in Model Photography

This case study shows how lighting was manipulated to create the perfect environment for a fashion photoshoot.
Quick Nav:
Materials Needed:
- 2 Strobes
- Shoot Thru Umbrella
- Big Octagonal Softbox
- Tall Black Gobo (deflector)
- Round Silver Reflector
- Big Octagonal Softbox
A Case Study in Lighting
This article in a close look at a project I recently worked on. Together with Stylist Natalie Svikle, we teamed up to create an fashion story that will be based on the way french woman dress. We called it L’Affaire Parissienne.
Step 1: Finding Perfect Model
It took a long time, before we found right model.
We needed someone very soft and friendly on the face, with cheeky smile that will bring an under layer to the shoot.
After about a week going through model books, we found Cathy from Compton Model Agency, here in Dublin.
We needed someone very soft and friendly on the face, with cheeky smile that will bring an under layer to the shoot.
After about a week going through model books, we found Cathy from Compton Model Agency, here in Dublin.
She was sweet, nice and most important for our project, she had that French quality, even though she is not French at all.
She was the one we wanted…
She was the one we wanted…
The Model is more important than you might think!
Remember that the model is not only a pretty girl. She has to communicate with you very well too. In order to get desired look/pose, meet her before shooting to make sure that you are on the same page.
Step 2: Setting Key Light
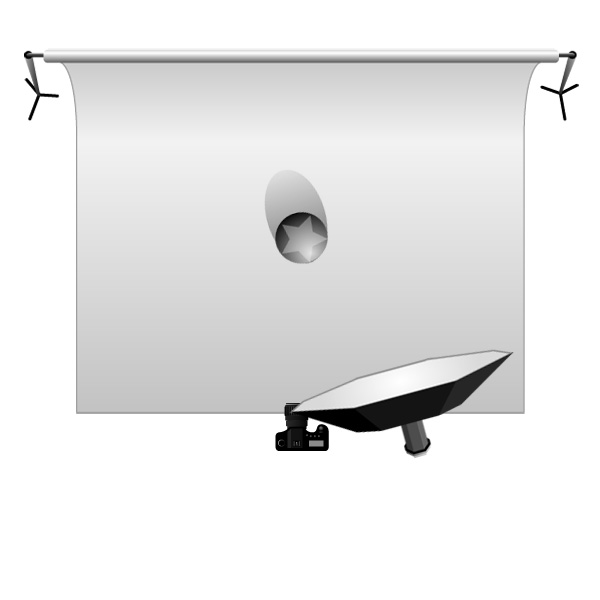
I wanted to create a natural feel to the photographs. I decided to use an Octagonal Softbox as main light source, on tcamera right. Setting it up close to model will give very nice soft light wrapping around her face. This is similar to light you might get from the sun shining through light clouds.
Following idea of keeping light natural, the main source will have to be placed just above our models head, and pointed a little bit down. Keep an eye on the shadow under her nose and chin, they can’t be too long.
Step 3: Background Light
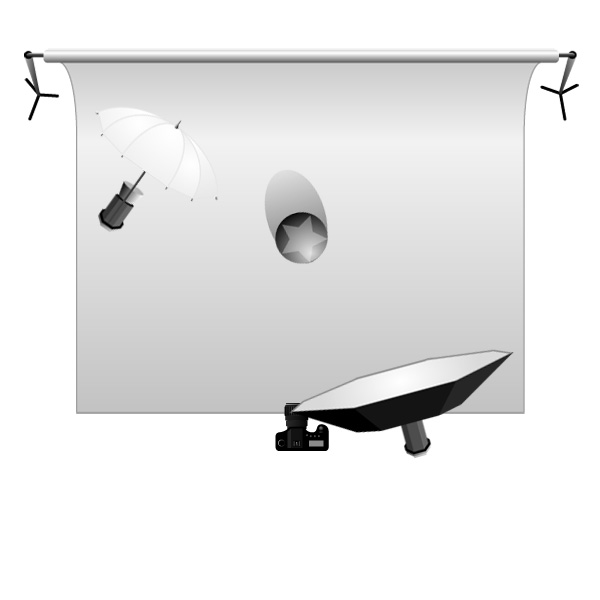
After setting my main light, I thought that the background (even though it is white) came out in my test shot too dark. Also, the model was casting a shadow which I didn’t want.
I needed additional light in the back. A Shoot Thru umbrella was the perfect solution: it gives nice, soft light, with quite an obvious hot spot. I placed it on the left of the camera.
As a White Shoot Thru umbrella is a type of light modifier that has very broad range of emitted light, it will also brighten up a whole scene a little bit. We will take care of this extra light in the next step.
Carefull!
White Shoot Thru Umbrella’s used in the way described above will spill on the model, creating unwanted shine on the side of the subject.
Step 4: Deflector, Reflector and Flag.
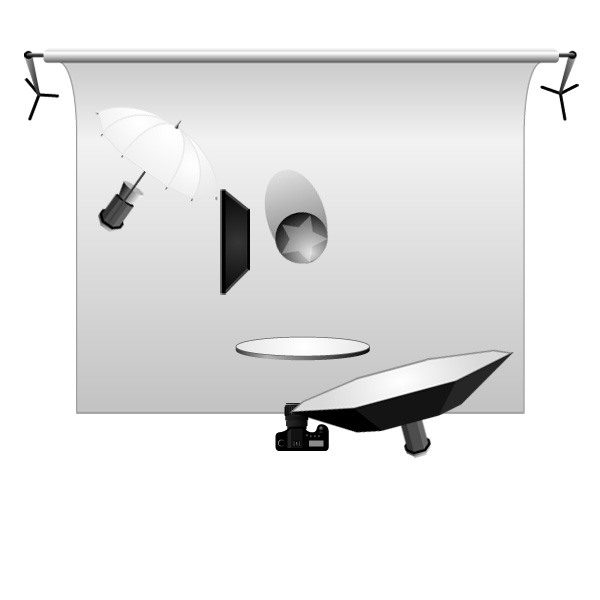
First of all we have to get rid of light spilling on our model from Background Light. To do this, I used Black Gobo (a kind of flag used to block light) as a Flag and at the same time it helped me to deepen the shadow on the models left side. Creating nice contrast between the well lit background and the model’s left side, I gain more focus on the clothes she is wearing.
Everything seemed to be ready for shooting. But shadows created by my key light, under the chin and nose, were a bit too dark.
A Silver Reflector was the perfect solution. Placed just under the camera, flat on the floor, the reflector bounced light coming from the key light and filled unwanted shadows with soft light.
Step 5: Camera Settings
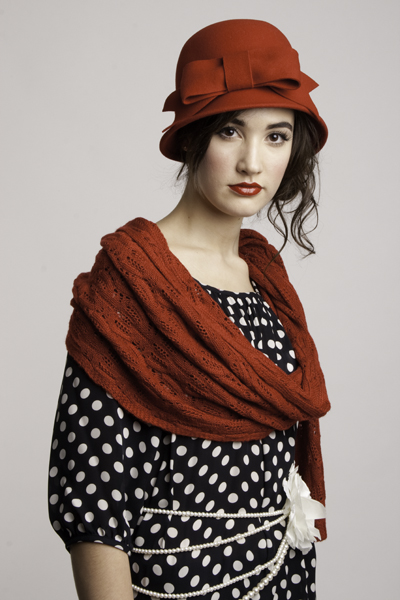
Everything was shot with simple (yet powerful) Canon 400D and kit lens 18-55mm @ 55mm. As you can see, even with low budget camera it is possible to get very attractive shot.
My white balance was set to flash, I find it easier than adjusting in Adobe Camera Raw. I used ISO 100 to get away from any possible noise, and thanks to f16 I could be sure that everything will be sharp in the shot (this is very important in fashion photography). Exposure time was 1/125.
photography: Maciej Pestka
Styling: Natalie Svikle
Makeup: Ciara Hanlon
Model: Cathy @ Compton
Styling: Natalie Svikle
Makeup: Ciara Hanlon
Model: Cathy @ Compton
A Photography Lighting Tutorial
Quality of Light
- The most important thing to think about when lighting a photograph is the quality of light you need. It is almost important to consider how best to achieve that quality. When thinking about quality of light, you first have to decide whether you want your light to be soft or hard. A light source that is small compared to the subject will be very hard, but a light source big when compared to a subject will give soft light. Hard light leaves hard shadows that sculpt and define a subject for an edgy look, but it can be harsh and unflattering. Sometimes hard light is exactly what you want, though, and a small light source further from your subject will do the trick.When soft light is needed, such as for portraiture or product photography, a larger light is necessary. Remember we are talking about quality--not quantity--so the light does not have to be more powerful, just larger in comparison to the subject. Bouncing a smaller light off of a wall or ceiling is a great way to turn it into a larger light source. By varying the distance between your light and your subject, you can alter the quality of light falling on your subject and experiment until you get the look you are trying to achieve.
Direction of Light
- The second most important thing to think about when lighting is direction. Where will the light come from in a photo is extremely important, as it dictates the pattern of highlights and shadows on your subject. It is important to get the flash a little bit away from the axis of the lens, as light coming from the side rather than straight on will reveal the depth and dimensions of your subject. This is why pictures taken with on-camera flash (such as license photos) often look so flat and dull. Many times you will find that you only need to move your light a little to the right or left of your camera to shape your subject, but experimenting with the position of your lights is key to coming up with new and interesting looks.
Using Additional Lights
- Another thing to think about is using multiple lights on a subject. The main light used to illuminate a subject is called a key light, and often photographers will use additional lights in their setups. A second light is often used to put more light into the shadow side of a subject, and this is called a fill light. The fill light is usually less powerful than the key light and it is this ratio of brightness to darkness that defines the contrast of your photograph. After starting with a key light, experiment with adding fill and moving just the fill light around to see how you can affect your photo's shadow tones.
Lighting Tutorial: Fashion Lighting Made Easy
I did a shoot back in February for one of my regular clients that was more fashion oriented. It was a 3-day shoot here in Montreal at theBlah Blah Studio.

The most important thing was to have consistent lighting throughout the 3 days since the chosen photos would be used for both the cover and chapter openers. Continuity was the key.
So we spent roughly 30 minutes testing various lighting setups. From simple one light to more complex with up to 5 lights. At the end we went with one of the most standard setups around. A simple 2-light setup. Have a look at the diagram…

Both lights were set at roughly 45 degrees about 3 feet away and about a foot above the models’ heads. I put the strobe slightly above their heads to create a small shadow underneath the chin. Both strobes had a 2 x 3 softbox for a soft diffused look. The key for my client was to eliminate as much shadows as possible. So this setup was ideal. My Nikon D300s was set at 1/200 sec at f9 and ISO 100. For this setup, both 400w strobes were at 50% power.
So there you have it! Sometimes it really doesn’t have to be complicated.
Here are a few sample shots from the photo shoot. Note that, a part from a slight curves adjustment in Lightroom, these images haven’t been retouched as of yet so they’re pretty much straight from the camera.
So there you have it! Sometimes it really doesn’t have to be complicated.
Here are a few sample shots from the photo shoot. Note that, a part from a slight curves adjustment in Lightroom, these images haven’t been retouched as of yet so they’re pretty much straight from the camera.